
Start With Warmth: The Goldilocks Zone
Warmth makes a starter faster and easier to schedule. 75–82°F (24–28°C) is a useful target for active feeding, but a healthy starter can also live at cooler room temperatures and will simply move more slowly.
< 75°F / 24°C
Sluggish, slow rise
75–82°F / 24–28°C
Active & predictable
> 82°F / 28°C
Watch the peak
Your starter's happy place. Aim for the gold.
Reading Goldie's Light
The Sourhouse Goldie gently warms your starter jar into the zone and tells you exactly where you stand at a glance:
Go deeper: why temperature runs the show
Build a Starter From Scratch
All you need is flour, water, a clear straight-sided jar, and a few minutes a day. Many starters become dependable in 10–14 days, but your starter's behavior matters more than the calendar.
Day 1: The Mix
Stir together 20g whole wheat or rye flour and 20g water in a clear, straight-sided jar. Cover loosely. Keep it warm. Stir again later in the day if you think of it.
Days 2–7+: Build the Culture
After the first 24 hours, keep 20g starter and feed it 20g water plus 20g flour every 24 hours. If it peaks and falls well before the next feed, switch to every 12 hours or use a larger feed such as 1:2:2.
A dramatic early bloom may be followed by several quiet days. That lull is normal. Keep the jar clean, stay consistent, and judge progress by the pattern after feeding.
Ready When...
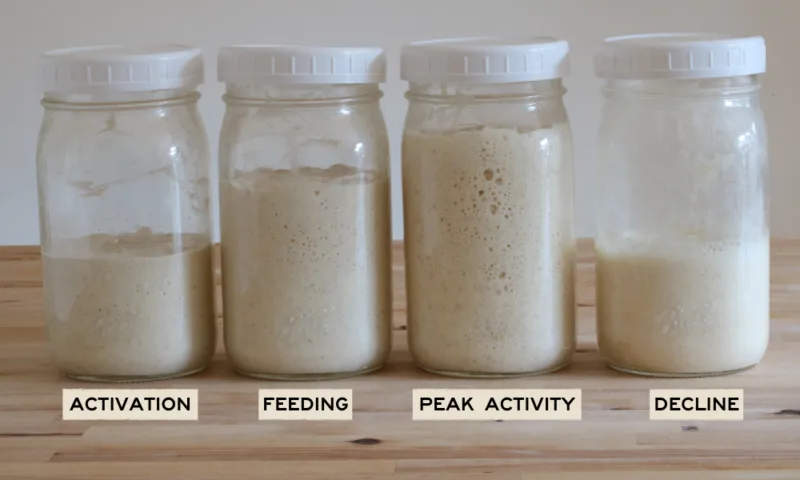
Your starter doubles in roughly 4–8 hours after a 1:1:1 feed for at least three feedings in a row, smells clean and pleasantly fermented, and shows bubbles throughout.
Go deeper: why whole wheat and rye first
The Daily 1:1:1 Feed
One simple ratio, by weight. Discard down to a small amount of starter, then feed it equal parts flour and water.
The Rhythm
- On the counter: feed at or shortly after peak. At 75–82°F, a 1:1:1 starter often needs feeding about every 12 hours. Use a larger ratio if you need a longer interval.
- In the fridge: feed about once a week.
- The ready signal: an established starter doubles in roughly 4–8 hours after a 1:1:1 feed at 75–82°F. Use its repeatable rise, aroma, and bubbles together as your green light.
Go deeper: what discard actually does
Your Starter's Home: Jar Maintenance
Your starter is only as steady as the jar it lives in. Pick the right vessel and keep it clean, and half your "what's wrong with my starter" moments never happen.
Choose a Jar With No Shoulders
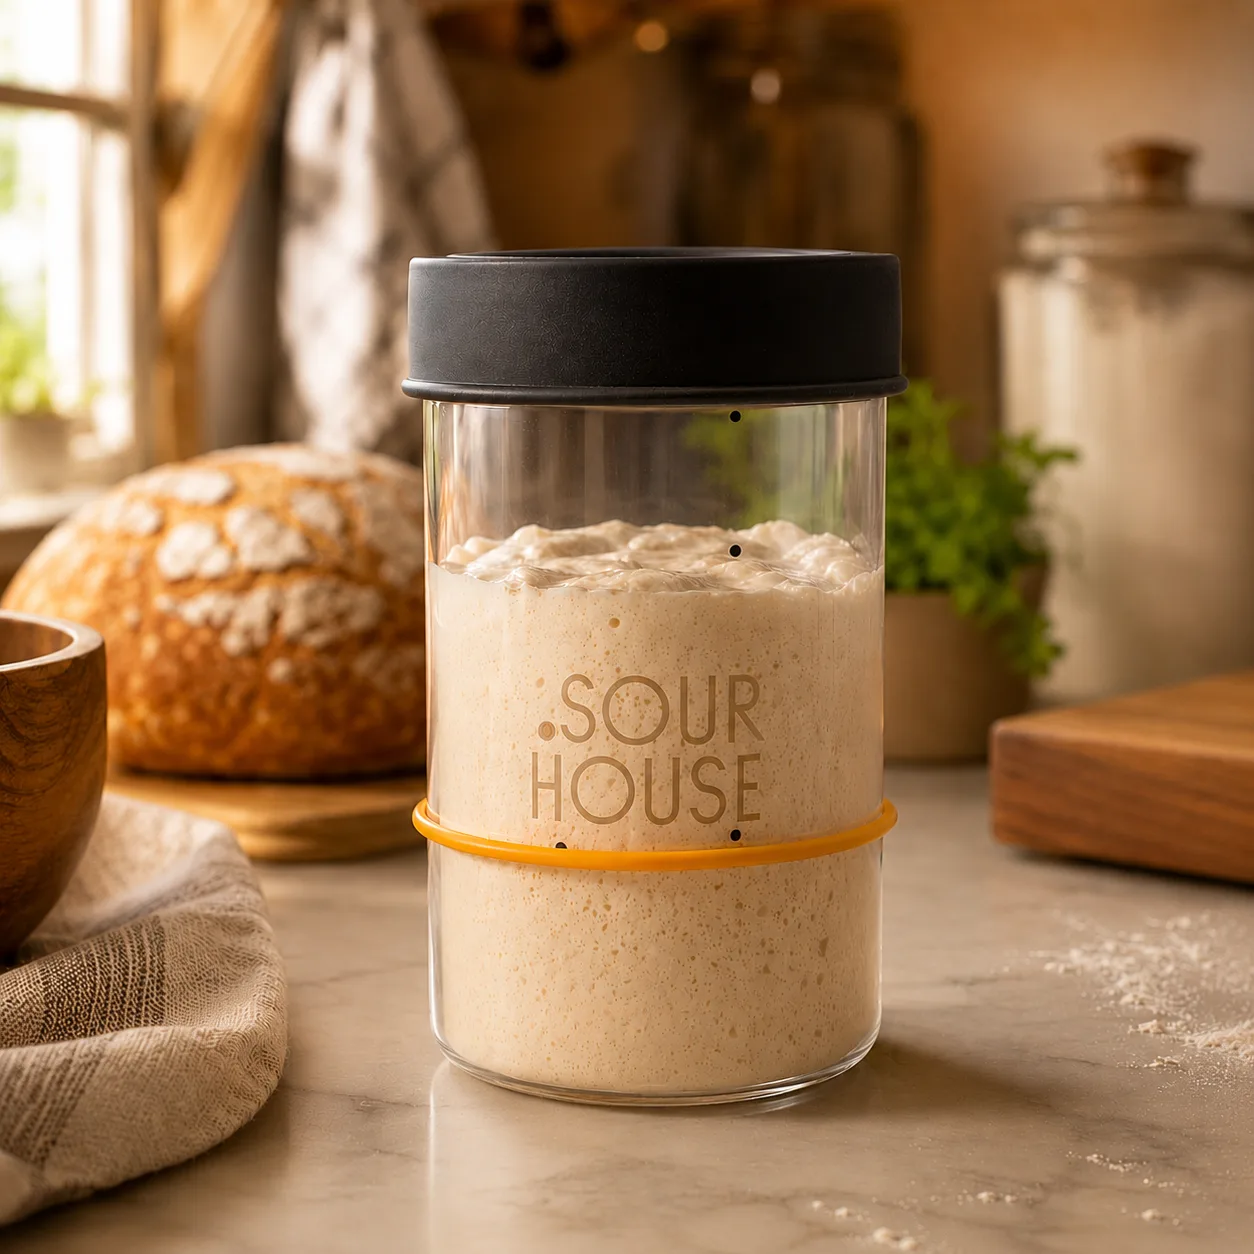
Straight-sided, not curved in at the top. A shouldered jar traps starter under the lip, hides the true rise, and makes stirring and scraping a chore. Clear glass lets you read the bubbles and the fall.
Give It Room to Climb
Fill no more than a third of the way after feeding. Your starter should double or triple without pushing the lid. A pint jar is plenty for a 20g routine.
Vent, Don't Seal
Use a clean solid lid set on top or screwed on loosely enough that gas can escape. A loose lid limits drying and helps keep dust and insects out better than cloth.
Keep It Clean
- Move your starter to a fresh, clean jar every week or so. Dried crust on the walls is where mold gets a foothold.
- Wipe the inside walls above the starter line after each feed. Stray smears up high dry out and can grow fuzz.
- Wash with hot, soapy water, rinse well, and dry the jar before use.
- Food-safe stainless steel, wood, silicone, and plastic utensils are all suitable. Avoid prolonged contact with reactive copper or aluminum.
- Mark the fill line with a rubber band so the rise is impossible to misread.
Go deeper: why the jar shape matters
Bake-Day Prep, On Your Schedule
Three steps stand between your jar and your recipe.
Step 1: Check the Recipe
Find how much starter your bake calls for.
Step 2: Scale Your Pre-Bake Feed
Do one bigger feed before your bake. Increase the starter, flour, and water so you end up with enough for the recipe plus about 20g leftover to keep your culture going.
Step 3: Time It, Then Bake
Give that same feed several hours before you plan to mix. Once it has at least doubled, it is ready to go into your dough. One feed does both jobs: enough starter, and peak timing.
Go deeper: time-to-double as your personal clock
Safe Starter, Safe Kitchen
Most "is my starter dead?" moments are nothing. Here is how to tell the harmless from the toss-it.
✅ Hooch: Totally Fine
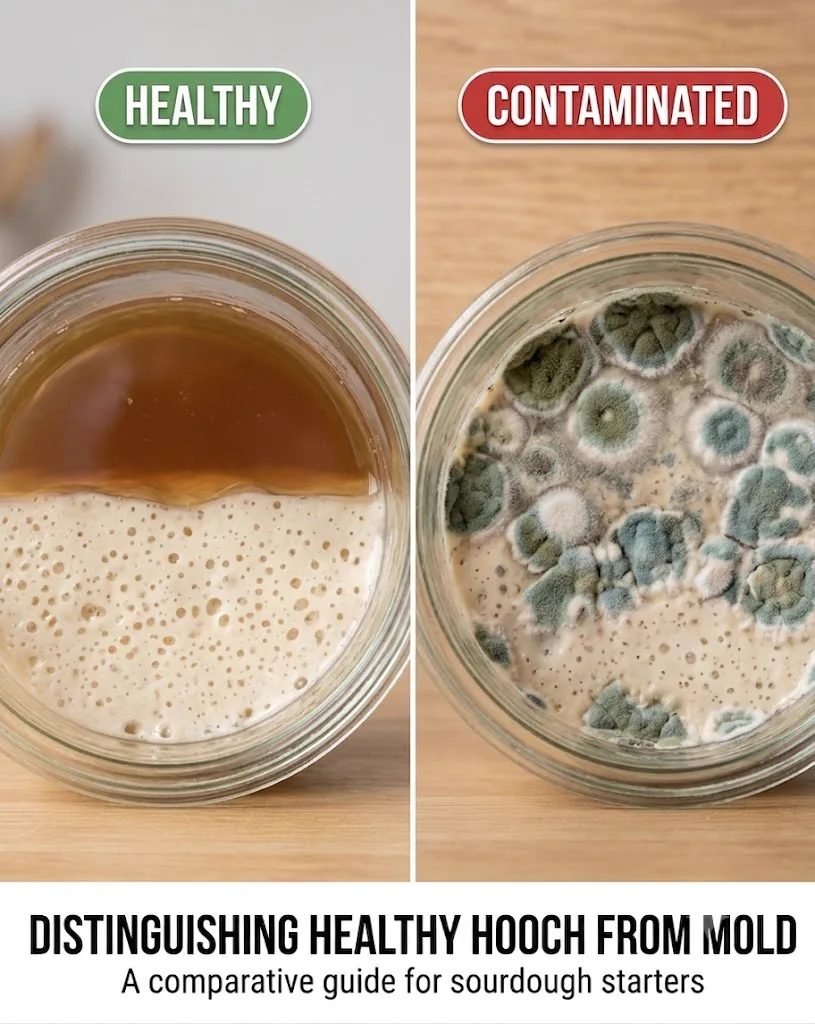
A layer of clear or grayish liquid on top just means your starter is hungry. Stir it back in for tang or pour it off, then feed as usual.
🛑 Pink or Fuzzy: Toss It
Pink or orange coloration, or fuzzy mold of any color, means contamination. Throw the starter out, wash the jar thoroughly, and restore from your dried backup.
Back Up Your Starter
Ten minutes of drying protects years of culture. Every serious starter deserves an insurance policy.
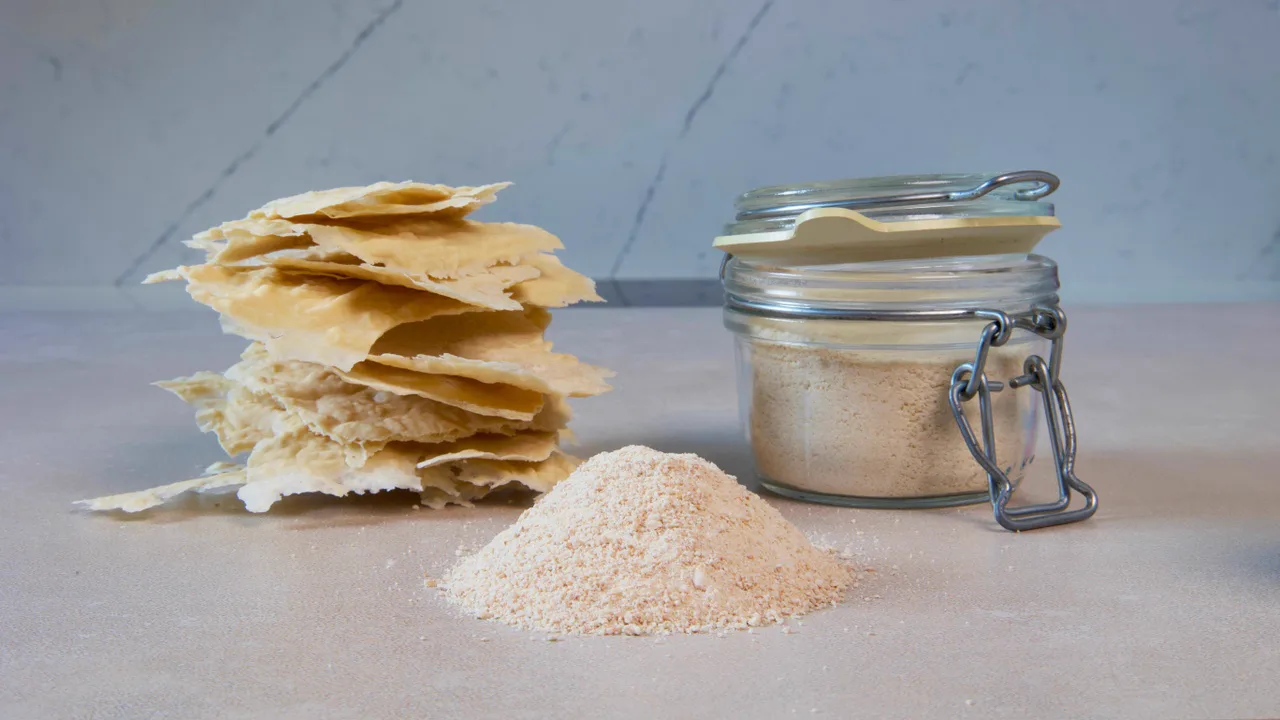
The Dried "Cracker" Method
- Spread a thin layer of active starter on parchment paper.
- Let it air-dry completely, then snap it into cracker pieces.
- Store completely dry flakes in an airtight, labeled container in a cool, dark place. Freezing can extend storage, but no backup is guaranteed indefinitely.
To Revive
- Soak a few grams of dried starter overnight in filtered water.
- Begin daily equal-parts flour and water feeds.
- Within days it is bubbling and ready for the 1:1:1 routine again.
Flavor Begins in the Starter
Here is the truth most recipes skip: your starter controls the flavor of your bread. Mild and creamy or bold and tangy, the choice is made in the jar before you ever mix dough.
 ▶
▶You Don't Hate Sourdough. You Hate Over-Fermented Sourdough.
Watch on YouTube → ▶
▶How to Control Flavor in Your Starter: Mild vs. Tangy
Watch on YouTube → ▶
▶Flavor From Fermentation: Why Time and Patience Beat Any Ingredient
Watch on YouTube →Go deeper: the mild vs. tangy dial
Know Your Starters
The 100% hydration starter in this guide is the workhorse, but it has cousins. Each one is the same wild culture kept at a different consistency, and each shines at different bakes.
Classic Liquid Starter 100% hydration
Equal parts flour and water. The everyday starter this guide teaches: easy to read, easy to feed, perfect for lean doughs and daily baking.
Best for: everyday sourdough, batards, boules.
Read the Starter Guide →Stiff Starter ~50% hydration
Half the water, twice the patience. A firm, doughy culture that ferments slower and favors milder, yeastier flavor with serious lifting power.
Best for: enriched doughs, milk breads, sweet rolls.
Explore in the Bread Authority →Pasta Madre Italian stiff starter
The lievito madre of Italian tradition: a tight, low-hydration mother dough with a gentle, sweet profile. The gateway to panettone and pandoro.
Best for: panettone, brioche, festive breads.
Unlock the Secrets of Pasta Madre →Yeast Water No flour culture
Natural leavening fermented from fruit, no starter jar required. A whole different road to wild yeast, and the subject of Henry's Yeast Water Handbook.
Best for: experimenting, mild sweet doughs.
How to Keep Yeast Water Alive →Go deeper: why hydration changes flavor
Preferments: The Bigger Family
Your sourdough starter is one member of an old family. Bakers have always fermented a little flour ahead of time to build flavor. Meet the relatives.
 ▶
▶Pre-Ferments: The Architecture of Flavor
Watch on YouTube →The Five You Should Know
- Pâte Fermentée: yesterday's dough, saved for today's flavor. Module 1 →
- Poolish: loose, wet, and elegant. Controlled fermentation, French style. Module 2 →
- Biga: stiff Italian preferment built for strength and structure. Module 3 →
- Levain: a sourdough offshoot built fresh from your starter for a single bake.
- Sponge: a loose, yeasted preferment of flour, water, and a little yeast, left to bubble before mixing. The classic sponge-and-dough method behind many sandwich and enriched loaves.
Read: What Are Pre-Ferments? The 5 Methods Every Baker Should Know →
The Starter Library
Everything else we have on starters, gathered in one place. All of it free, all of it road-tested by the Baking Great Bread at Home community.
🎥 Watch
- FoundationsSourdough Starters: A Living System 101
- ReadinessIs Your Starter Ready? The Float Test Explained
- Wild YeastHow to Make a Green Apple Sourdough Starter
- TroubleshootingFruit Flies in Your Starter? Here's What to Do
- Beginner SeriesSourdough for the Rest of Us
📖 Read
- The ManualThe Complete Sourdough Starter Guide
- RevivalIs My Starter Dead? (Spoiler: Probably Not)
- TroubleshootingThe Great Hooch Debate 2.0
- BackupDehydrating Your Sourdough Starter
- SeasonsWhy Summer Changes Your Dough
- Pasta MadreBrioche with Pasta Madre: A Delicious Experiment
🎓 Learn
- Academy CourseSourdough Starter 101: Capturing Life in a Jar
- Day by DayDay 1: Birth of Your Starter
- Day by DayDays 4–7: Building Strength
- MaintenanceStarter Care & Maintenance
- RescueIs My Sourdough Starter Dead?
- The BookSourdough for the Rest of Us
Your Starter Toolkit
This guide is the map. These are the tools that walk it with you, all from the Crust & Crumb world.
🧙 The Companion App
- Starter SorcererTrack feeds, timing, and readiness on your phone
🧭 Go Further
- Fermentation CompassDial in your timing and temperature
- Recipe PantryPut your starter to work on real bakes
- Market LevainScale your levain up for selling
🏡 The Communities
- Home BakersCrust & Crumb Academy
- Selling Your BreadFrom Oven to Market
